Pages

Monday, 17 August 2015

Wreck This Journal: Drop Something Here


What do you see?
I've been always curious about how people try to get into our minds, one of my favourite methods is the Rorschach Test / Inkblot Test.

I dropped different colors of acrylic paint on to one of the pages and closed the book to make the print.

Colours I used:

  • Titanium white
  • Phthalo green
  • Phthalo blue
  • Iridescent rich copper
  • Iridescent purple
  • Iridescent silver

I love this technique because you can't control what's gonna happen and every piece is unique.
I'm planing on making a few of this to hang on the wall, but not as colourful as this one, I would use blank and burgundy or black and purple.

Sunday, 2 August 2015

Wreck This Journal: Draw Fat Lines and Thin


Not much to say about this page... It's just a crazy staircase done with a 'B' pencil. I sketched the lines and filled them pushing really hard.

The 3D effect is very easy to achieve if you have a shape in mind.
I really like surrealist drawings and I'm planing on making something like this but even bigger and crazier for my living room.

Stay tuned!

Sunday, 26 July 2015

Wreck This Journal: Make a Paper Chain


I have a passion for music and I love a few heavy metal bands, so I thought the lyrics 'Breaking the Chains' by Dokken, seamed kind of perfect for this page.
I sketched the heart with a blue ballpoint pen and I did the shading with a blue pencil. The background was done smudging a brown pencil.

To make the chain, I cut the strips, folded and twisted them to give a more realistic look. And then I painted random strokes of silver, copper and black.

A simple page but it has a lot of meaning for me..


Monday, 20 July 2015

Wreck This Journal: Fill this Page with Circles


When I thought about circles instantly came to mind Victor Vasarely (op art), Georges Seurat (pointillism) and Pop Art.

And because I couldn't decide which way to go, I combined everything in a single drawing.


So this is a 'pop art' girl visiting the museum.
I did everything with markers and free hand, no sketching involved that's why it's a little bit bumpy.

If you don't know Victor Vasarely I'd recommend to check him out, his art blew my mind when I was 14 years old and that's what got me into creating things and later into studying art history.

Sunday, 19 July 2015

Wreck This Journal: Create a Drawing Using a Piece of Your Hair


This is one of my favourite pages,  I used my cat Satan as a nude model. I sketched him quickly, I covered the drawing with PVA and gradually I added small pieces of my hair. 

But don't worry, I have an undercut so I do this on weekly basis. The good thing is that now I've found a fun thing to do with my discarded hair.

To colour this in I used acrylic paints because it dries rapidly and it covers everything.
For the cat I used:
  • Burnt Umber
  • Burnt Sienna
  • Cadmium Yellow Deep
  • Titanium White 
  • Phthalo Green
  • Black pen
Background
  • Phthalo Green
  • Titanium White
  • Pencil for shading

I like to combine unusual colours to experiment and make something that it's not expected.


Tuesday, 14 July 2015

Wreck This Journal: Trace Your Hand


I drew this page while having a conversation via skype, I live far away from my family and most of my friends, so I can easily spend a few hours chatting. 

The polaroids you see, are actually doodles of real pictures that we were talking about that day.
The last holiday with my friends, my first flat in London, etc.

I used a pencil to sketch everything, a blue and a brown regular color pencils for shading, purple and silver metallic pens for the nails and a black pen to trace the final lines.

I've always had difficulties to draw hands, even to the point that I would leave every single drawing with unfinished arms. But I realized that it was more of a mental block rather that lack of ability. And this happens to a lot of people, we need to forget about the object and just focus on drawing lines, sometimes it helps to draw the negative space between objects.

Sunday, 12 July 2015

Wreck This Journal: Cover this Page Using Only Office Supplies


This is supposed to be a giant raising to the surface and blowing some trees, hehehe.

I cut the giant out of thin cork board, the eyes are made of yellow thumb pins, I glued staples for the hair and elastic bands for the clothes. And I used white clips to simulate the wind.

The trees are made of silver clips and pieces of pencils. I used an eraser for the sky. And a mixture of clear tape, pencils shavings and plastic from a double sided tape to form the terrain.

To glue it all together I used PVA and all purpose adhesive (UHU).

Wreck This Journal: Crack the Spine


At the beginning I was a bit lost, I didn't really know what to do with the journal. So I decided to choose every day a page at random and 'force' myself to work only on that page and focus.
But, as you may now know, that didn't last long...


I'm the kind of person who starts a 100 projects at once and then gives up each and every one of them little by little, that's why it was so important to focus.

So the 'Crack the Spine' page, I did a quick sketch of a (anatomically incorrect) broken spine, I know, very original... But I did crack the spine of the book, I opened it to the middle and pressed hard.

Saturday, 11 July 2015

Wreck This Journal: Instructions


The instructions page... where do I begin? The tittle of this journal appears often in the comments, usually to remind me that I did it wrong. But I think this people seem to have overlooked the 'Instructions Page'.
  1. Carry this with you everywhere you go. 
  2. Follow the instructions on every page.
  3. Order is not important.
  4. Instructions are open to interpretation.
  5. Experiment. (work against your better judgment)
And we shouldn't forget about the author Keri Smith, who is a conceptual artist who makes this books for people to experiment, even if they think the can't.

Thanks to this book, I used methods and materials that I wouldn't think of using before, I gained confidence in my drawing skills and I don't worry anymore if a drawing is missing or if I screwed up, because what is important is the process of making something out of nothing.


So there is no right or wrong way, just do what you want and enjoy it.


Sunday, 14 June 2015

Wreck This Journal


Last year I started a project called 'Wreck This Box' by Keri Smith. It's a collection of art journals that makes you experiment, explore and extend your imagination with a series of tasks that you need to complete.


I finished 'Wreck this journal' last year in August,  'Mess' will be finished in a couple of weeks and I'm currently working on 'This is not a book' and 'The pocket scavenger' but more slowly, as well as in other journals that I will talk about in future posts.

Since then I've been posting daily pictures of the progress on Instagram and weekly videos on my Youtube channel. But I noticed that some of you ask me the same questions and often my answers get lost on the comments... So I thought It could be useful to post a detailed description of every page here, how I did it and what did I used.


Watch the flip through here:


Thursday, 27 December 2012

How to make a Candle holder


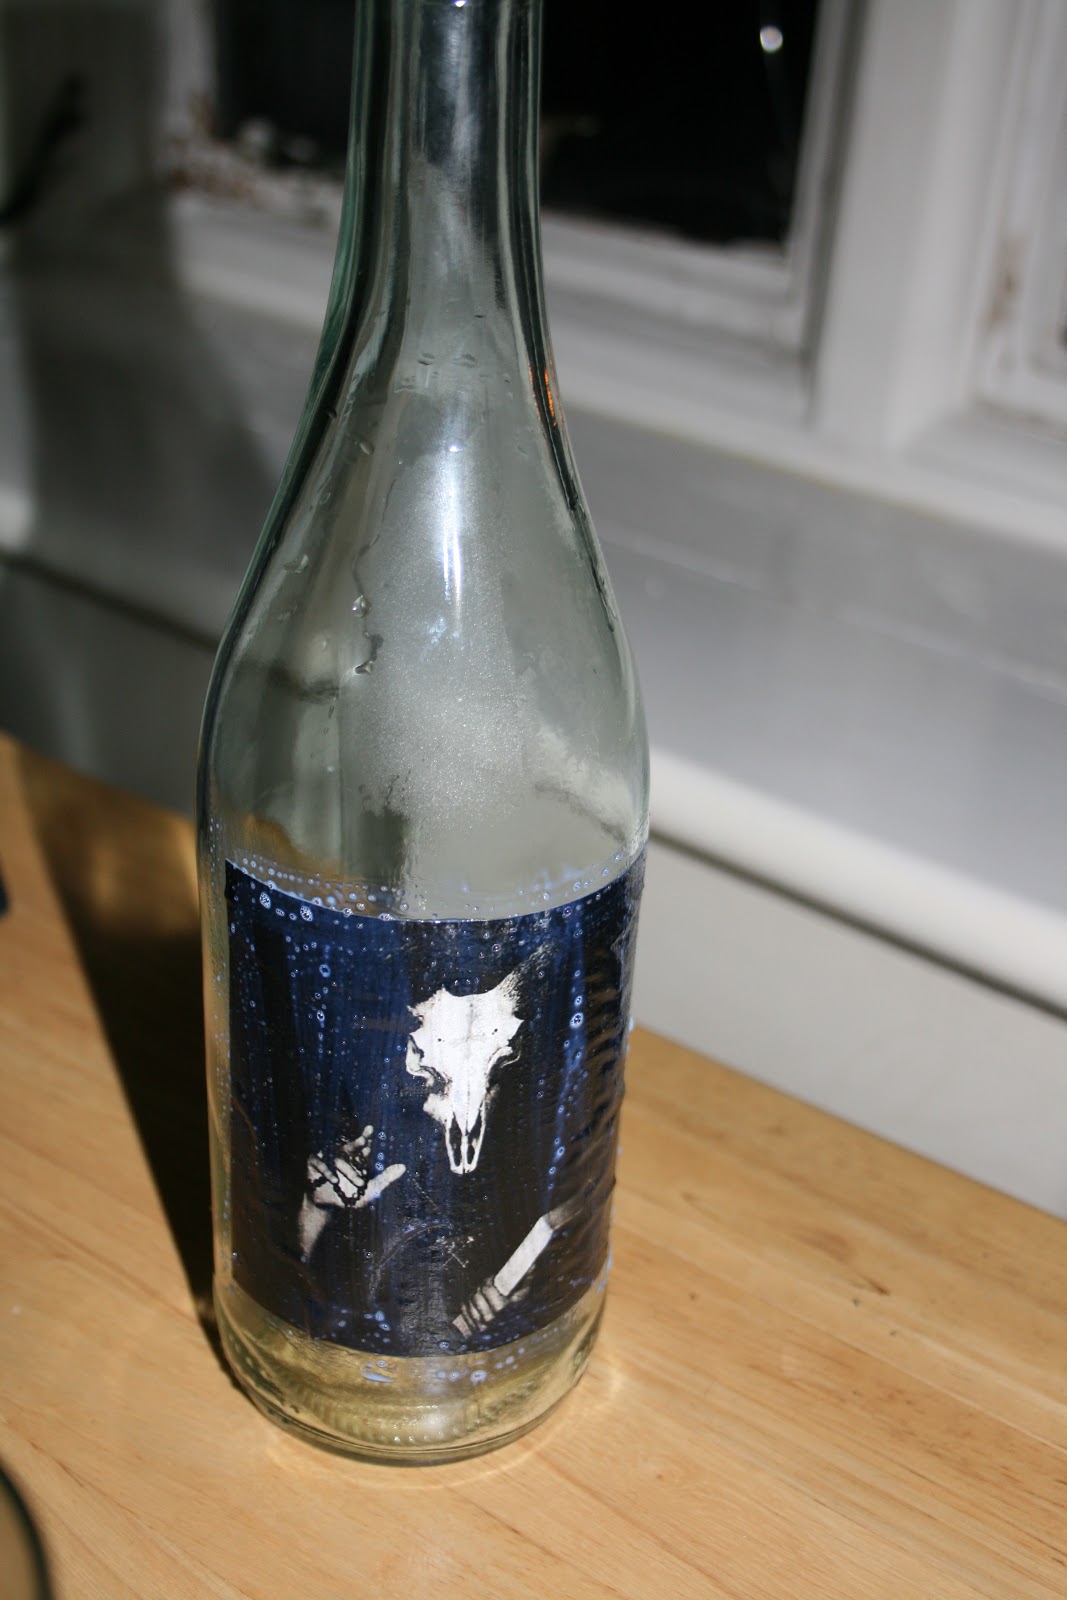
Hello! I wanted to share with you how to recycle a bottle and make a candle holder.

What will you need?
  • Bottle
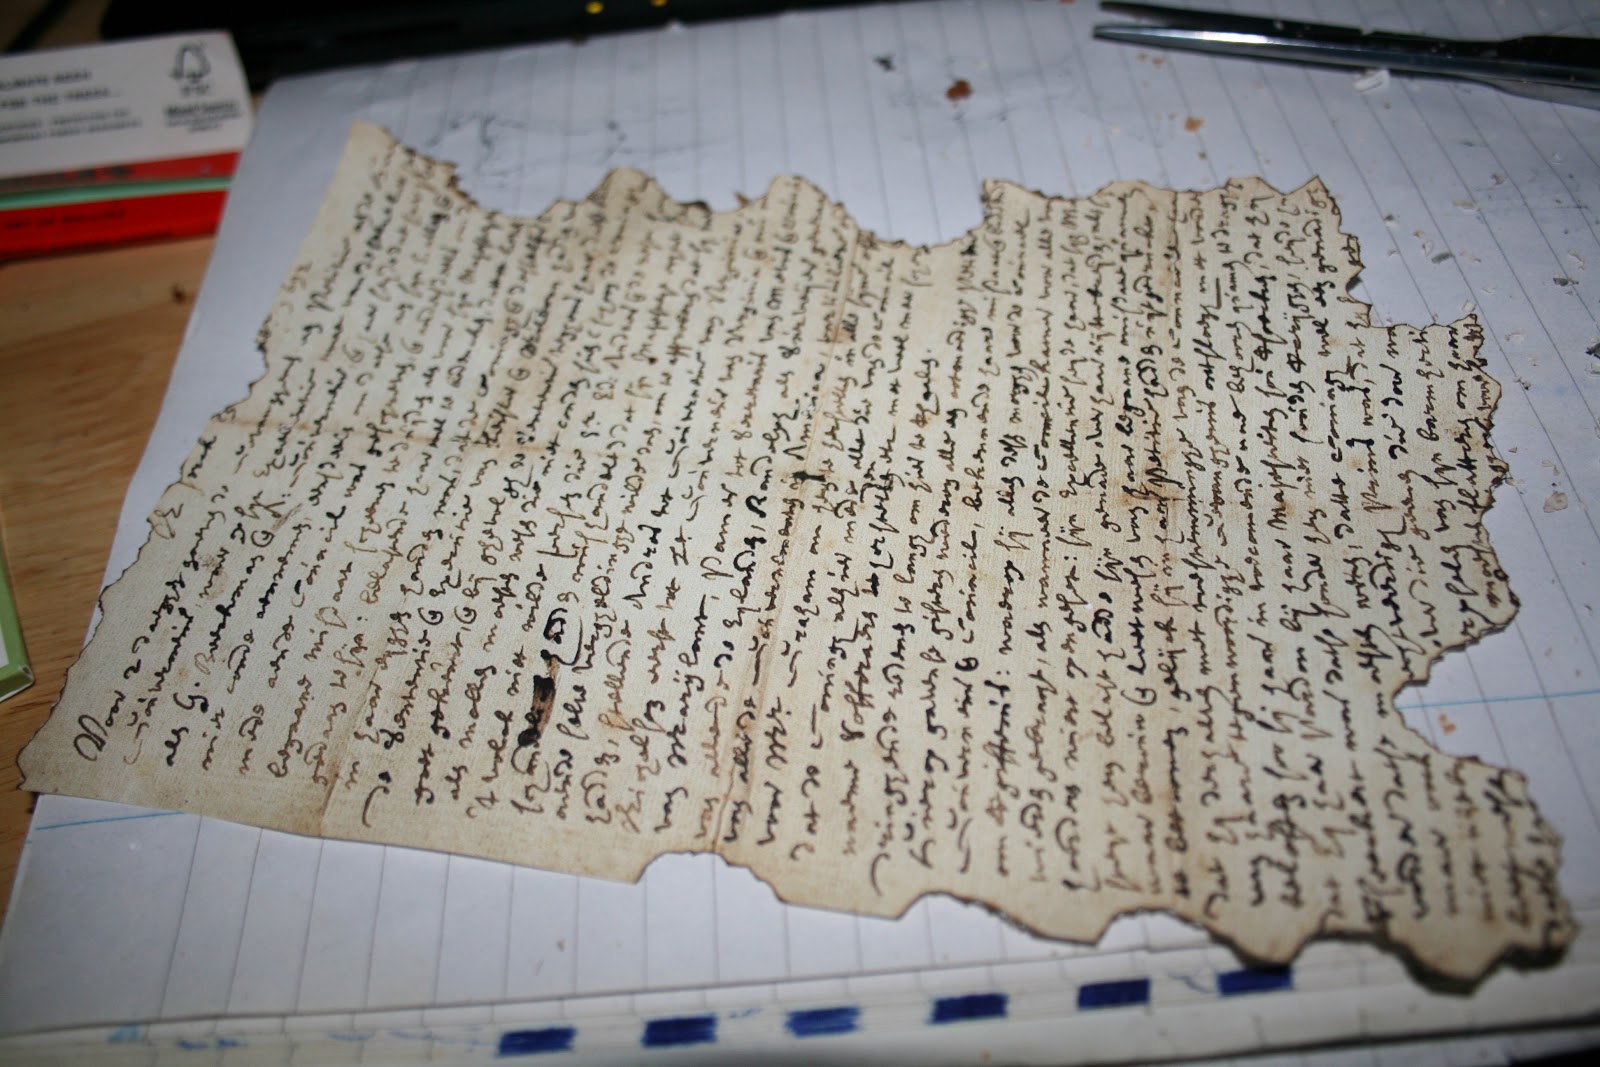
  • Picture or paper and a printer
  • Sealer
  • Sand or salt and paint
  • Candle
  • Ribbon
  • Thread
  • Key or whatever you want to put inside
1 Step: Drink the bottle you want to use ;)

2. Clean the bottle the best you can and get rid of all the sticky paper.

3. If you have sand, skip this step.
    Put some salt and paint in a bowl and mix it until you have the colour you like.


4. Print a picture!


5. Use the sealer to glue it to the bottle.


6. Print an old looking letter and burn the edges. But don't burn the house!


7. Put all the stuff you want inside! I rolled the letter and closed it with ribbon, I also put some fishnet and hanged a key inside. And I let a few candles to melt.


8. I added a ribbon to the top of the bottle too.


I hope you like it! Share your own version! More post soon!

Friday, 23 November 2012

Projects I'm currently doing

Hello! In this post I'm going to show you the projects I'm currently doing:

1. This is a cat food box that I cut in half , glue some pages of a dictionary and I paint it with watercolours to give it an old look.


2. This is a family portrait, I'm using acrylic paint and a piece of wood.

3. I'm decorating a shelf to be "more like me" and not so boring... I'm using acrylic paint as always.

               more updates soon!!

Tuesday, 9 October 2012

How to revamp your old T shirt


Hello everyone! Today I'm gonna share with you how to revamp your old T shirt that is forgotten in the bottom of your wardrobe.

What do need?

  • An old T shirt
  • An old over-the-knee socks
  • scissors
  • threat and needle
  • Tape or a marking pen
  • Ribbon
Step 1:  Mark your T shirt with a pen or tape at the height you like.


Step 2: Cut out below the mark.


Step 3: Do the same with the back, but this time cut over the mark.


Step 4: Take your old sock and cut it out the top and the bottom. Cut it in half so you can have two long parts.


Step 5: Fold them and sew them to the top of the T shirt. Pass a ribbon across the sock pieces and tide a knot. I sew it by hand, but if you have a sewing machine it's much easier. And that's it!


 I hope you like it! And as always share your own version with me!!


Monday, 24 September 2012

How to recycle cat food boxes II


Hello! In the last weeks I didn't have enough time that's why I haven't post anything, but I'm back!
This is another project you could do to recycle dry cat food boxes:

Materials:
  • Cat food boxes
  • Acrylic paint
  • Brushes
  • Glue gun
  • Hot glue sticks
  • Cutter
  • Sealer
  • Old net tights

Step 1: Take the boxes and cut the top.


Step 2: Put the boxes on top of each other and glue the edges only with hot glue. Be careful! You have to hold them well together, you could use a ribbon around so it is tight and doesn't move while gluing it.


Step 3: Paint the boxes with acrylic paint, the color of your choice. Mine as always BLACK!  ^.^
Let it dry, apply the sealer and let it dry a few minutes more.


 Step 4: Take those old net tights out of your closet, (I'm sure you all have, hehehe) break them if they are not broken enough. Put some hot glue on the corners of the box or wherever you like and add the net. You only need a little amount of glue for this.


And that's it!! I use mine to store craft papers, you could use it for magazines, letters, recipes...
It's cheap, good for the environment and entertaining!


Monday, 10 September 2012

A different way to hang your puzzle


Hello again!

Now I'm gonna share with you a different way to hang your puzzles...
I don't like spending more money on a frame than on the thing I wanna hang. And I couldn't find a cheap frame in this size, so this is what I did:

Materials:

  • Puzzle
  • Foam board
  • Lace / ribbon
  • Hot glue
  • Glue gun
  • Liquid glue
  • Puzzle conserver
Steps:

1.Cut the foam to the size of your puzzle.

2. Glue your puzzle to the foam using liquid glue, then use the puzzle conserve to seal the puzzle and let it dry for an hour.

3. Take the lace or ribbon and glue it to the puzzle with hot glue. If you like you can fold the ribbon a little bit while you are gluing it so it is not straight.


4. Make 4 little bows with ribbon and glue them to the corners. And that's it!!


I know that in this case I didn't use a glass or something like that to cover the puzzle, but the Puzzle conserver makes a pretty good job, so I think it's gonna last.

As always feel free to share your own version!

P.S.: If you wanna hang it in the wall you can glue a hanger on the foam making a little hole.
Related Posts Plugin for WordPress, Blogger...